Last few months I spent my free time building Confello - a tech conference aggregator. You can read more about it HERE. I built it with GoBuffalo, a Go Web Framework. At first, I deployed the website on Heroku using the provided buffalo-heroku plugin. Before launching, I wanted to optimize the website on reverse proxy (gzip, expire headers …). Since Heroku doesn’t provide access to reverse proxy (Nginx), I looked for another solution. I found Dokku - which turned out to be great and easy to work with.
A decade ago deploying an application was quite complex. Nowadays with many PaaS offerings, it’s quite trivial to deploy an application. Whether you use Heroku, Google’s App Engine or AWS Beanstalk being a developer that needs to deploy something was never easier.
I’ve heard of Dokku long ago but never had the chance to use it. And I regret I haven’t had the chance to use it before. It’s trivial to set it up, well documented and works very well.

According to its authors, Dokku is the smallest PaaS implementation you’ve ever seen. It helps you build and manage the lifecycle of applications.
For most apps, a simple git push will be enough as under the hood Dokku will detect the type of application and use one of Heroku’s buildpacks to build and deploy the application. However, GoBuffalo is a bit more complex requiring a custom binary thus it’s unable to use standard Go buildpack. Luckily, there is Docker and Dokku fully supports Dockerfile deployments.
To get started, you need a VPS/Dedicated server like DigitalOcean. DigitalOcean even offers a single click Dokku deployment, which I haven’t had the chance to try. With the manual setup, you get the latest version (currently DigitalOcean is 3 major versions behind) and will actually learn something new.
Once you have a running a Ubuntu image (preferably the latest one, using SSH authentication instead of password one), log in to it and run:
# Before running these, check Dokku website for latest version: http://dokku.viewdocs.io/dokku/
wget https://raw.githubusercontent.com/dokku/dokku/v0.17.6/bootstrap.sh && \
sudo DOKKU_TAG=v0.17.6 bash bootstrap.sh
Before running these commands you can see on what’s the latest version and replace v0.17.6 with it.
After executing both commands and waiting for a while, open server’s IP address (or domain if nameservers are pointed to this server) in your browser. You should be presented with a similar screen:
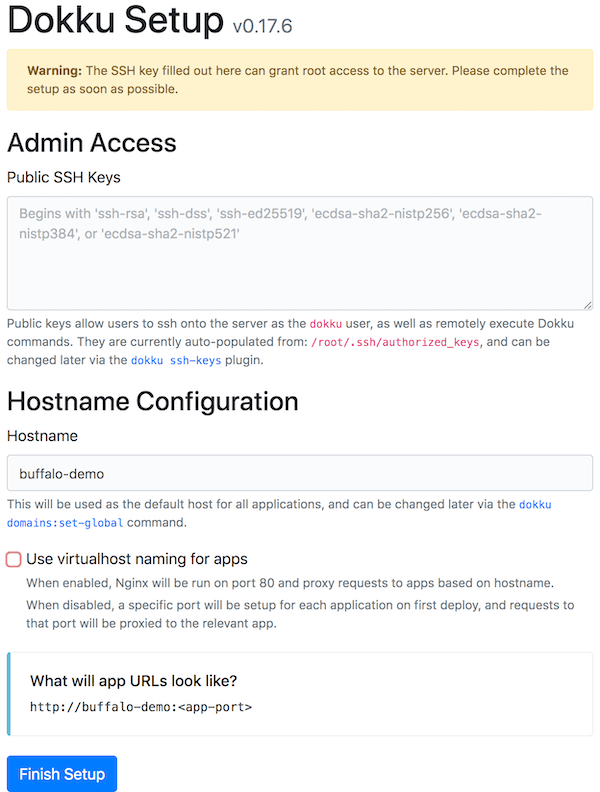
Most of the options can be changed later on, but free feel to modify something if needed. Once the setup is finished proceed with creating the app on Dokku.
# Replace buffalo-demo with desired app name
dokku apps:create buffalo-demo
After the app is created, let’s create a database a link it to our app.
sudo dokku plugin:install https://github.com/dokku/dokku-postgres.git && \
dokku postgres:create buffalo-demo-db && \
dokku postgres:link buffalo-demo-db buffalo-demo
Setup SSL via Dokku’s official letsencrypt plugin:
sudo dokku plugin:install https://github.com/dokku/dokku-letsencrypt.git
dokku config:set --no-restart buffalo-demo DOKKU_LETSENCRYPT_EMAIL=ribice@gmail.com
dokku letsencrypt buffalo-demo
Last but not least, you have to set-up domain names. Normally, you’ll point your nameservers from domain provider to server, and set them up using domains configuration on dokku. In my case, I just changed it to an IP address since I don’t have a domain for this demo project.
# Replace IP address with your domain name
dokku domains:set buffalo-demo 12.345.6.78
dokku domains:set-global buffalo-demo 12.345.6.78
The server-side setup is done. Let’s move to our application now.

Install GoBuffalo by following the official guide HERE. Once you have it installed and set-up in your PATH create a new GoBuffalo application by running:
# Replace demo with app name
buffalo new demo
yarn install
Update the database.yml file with connection parameters for your local database and run the application with:
buffalo devYour application should be accessible on http://127.0.0.1:3000/. It’s time to create our Dockerfile.
# This is a multi-stage Dockerfile and requires >= Docker 17.05
FROM gobuffalo/buffalo:v0.14.4 as builder

# Replace PATH with your application path
RUN mkdir -p $GOPATH/src/github.com/ribice/demo
WORKDIR $GOPATH/src/github.com/ribice/demo

# Cache the NPM install step unless package.json changes
ADD package.json .
ADD yarn.lock .
RUN yarn install --no-progress
ADD . .
RUN go get $(go list ./... | grep -v /vendor/)
RUN buffalo build --static -o /bin/app

FROM alpine
RUN apk add --no-cache curl
RUN apk add --no-cache bash
RUN apk add --no-cache ca-certificates

WORKDIR /bin/

COPY --from=builder /bin/app .

ENV ADDR=0.0.0.0

# Uncomment to run the migrations before running the binary:
# CMD /bin/app migrate; /bin/app

CMD exec /bin/app
After creating Dockerfile, (optionally ) create a .dockerignore file with following content:
node_modules/
*.log
bin/
It’s time to deploy our application now. Add a new git remote by running:
# Replace address with server's address and buffalo-demo with the application name
git remote add dokku dokku@12.345.6.78:buffalo-demo && //
git push dokku
And that’s about it. Once the deployment is done, you’ll be notified in your terminal:
=====> Application deployed:
http://12.345.6.78
To 12.345.6.78:buffalo-demo
ff8ee37..ba90ddf  master -> master
Opening the provided link will lead you to your deployed GoBuffalo application (the SSL does not work because I haven’t pointed an actual domain name to my server, and instead use IP address):

If you have any questions or need some small help feel free to ping me on Email.